
Image recognition and interpretation is a very requested task into modern application. Either you want to identify a specific image or object or either you want to interpret what the users get in front their smartphone camera.
A technology that is becoming more and more popular among developers with this task is Vuforia. This framework can recognize a specific image and track it while the image is in the scene. And, of course, you can handle that and do almost anything. The same goes to Custom 3D object, Cylinders, boxes, etc.
Moreover, Vuforia is widely accepted because we can use it with almost any device, from older and cheap Android smartphone to the most recent VR/AR/MX devices. In this post, we will use the Vuforia capabilities from Unity3D because it is also multi-platform.
You can access this final project code in github repo.
Prerequisites
First, we need to download Unity3D from here. You may try the personal (and free) plan. In the meantime, it is installing, review What is Unity3D.
When installing Unity, be sure to install the Windows Store platform, and the .Net Scripting Backend
What is Unity3d?
Unity3D is a videogame engine, which have support for 3D and 2D games. It has physics, collision, light and much more to use. It has a very simple but powerful IDE and we can include scripts in JavaScript or C#.
Unity3D have a great and complete community with great tutorials with various levels of knowledge.
We can use the built-in editor to code or any version of Visual Studio. If we install the Visual Studio Tools for Unity, we can attach it to Unity and debug our code. Additionally, you can run your game inside Unity3D to test and debug your game.
We can generate the output for Windows, Linux, MacOS, many mobile OS (Android, iOS, BlackBerry, etc.) and finally, we also can create executable for Xbox, Xii and PS3/PS4/PSP platforms.
We also have an enormous, great integrated, Assets Store (paid and free) to don’t need to design buildings, characters, effects, code, and all we can need.
What is Vuforia?
Basically, Vuforia is a framework for image and object recognition and tracking. It has a developer portal where we can upload images to a database that later can be used for tracking other images and objects.
Shall we code?
Step 1: Setup Vuforia Database
- Download from here the latest Vuforia SDK for Unity.
- Navigate to the Vuforia Developer Portal, Log in or Register (if this is your first time). And click on the Develop top section and next click on the License Manager and click on the Add License Key button. Licenses will determine your final target for your project. By now, we will choose the Development option. Complete with an Application Name like VuforiaImageSample.

Add Vuforia’s License Key - Confirm your choice and notice your Usage Quotes.
- Click on the name of the recent created License. And save the License Key for later usage.
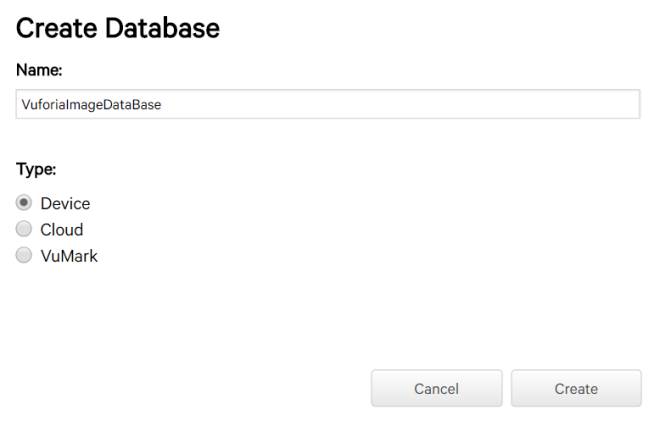
- Now, let’s create our database to upload our image. Click on the Target Manager on the top sub-menu. And then click on the Create Database button. Choose a Database name (like VuforiaImageDataBase) and select Device as Database Type. Accept to dialog clicking on the Create button.
- Now, we will need an image to upload. Take in consideration that you can upload any image that you want, but you must think that Vuforia will works better with a high quality and contrasted image. For our sample, we will choose this Octocat image.
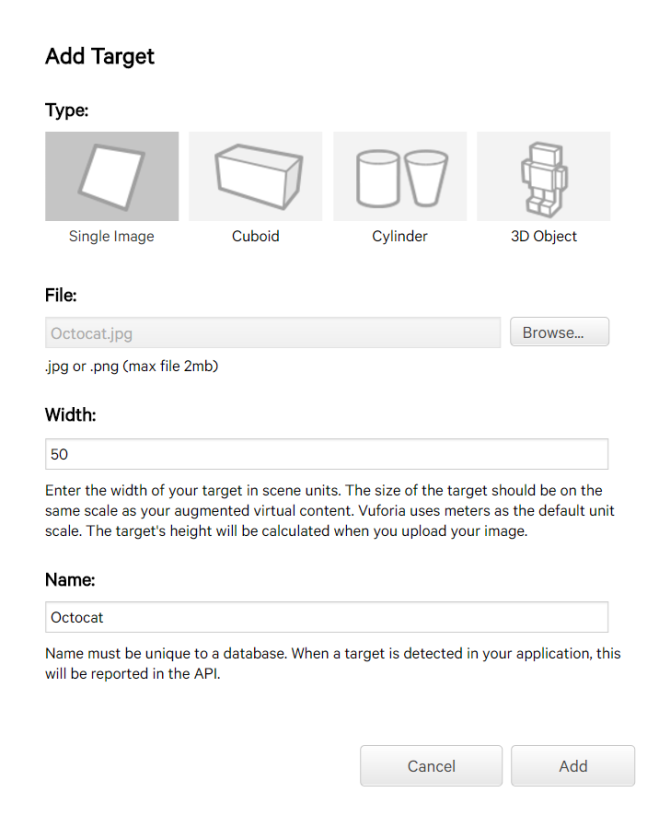
- To finally upload our image that will be recognized, click on the Add Target button. And a popup like the next image open. Choose the Single Image as the Type, pick up the image you want to upload and enter the Width for the image. This is not the image width, instead is a relative unity which allow to scale in relation with others image you have in the same Database. At this moment, we don’t plan to have another image so let’s enter 50. Click on the Add button to process to upload the image.
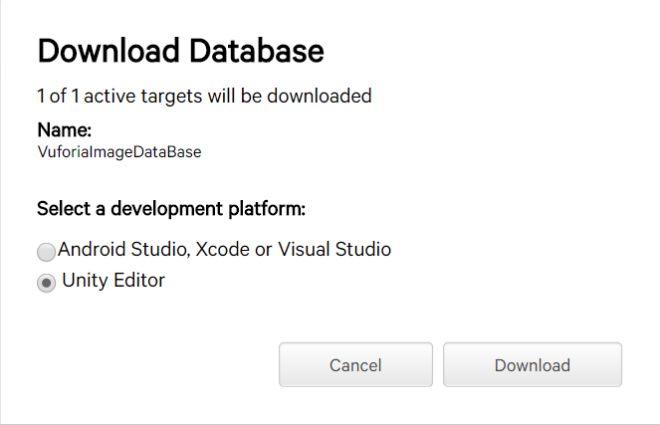
- Al most finish here. Now you should see a grid with the image and the most important here is the Rating. Higher Rating make easier to detect the image. Click on the Download Database button and a new popup will show. Choose Unity Editor and click on the Download button and save the given file.
Step 2: Create Unity3D project and import Vuforia asset
- Now, we need a new Unity3D project. So, let’s create one starting Unity3D and click on the New button. Complete the project name with any of yours choose, VuforiaImageSample may be a good one, and a location folder as you consider best.
- Import the Vuforia SDK. Go to the menu Asserts -> Import Package -> Custom Package and locate the .unitypackage file you have downloaded in the previous step. After a few moments, a dialog will show to confirm the import process. Click on the Import button.
- We will do the same with the Vuforia Database we downloaded at last in the previous step.
- Now, let’s do some magic here. In the Hierarchy tab delete the Main camera component. On the Project tab, navigate to the Vuforia\Prefab folder and drag the ARCamera component to the Hierarchy tab. This component will be the camera which your app will constantly scan and trying to identify your image. With the ARCamera selected, go to the Inspector tab and click on the Open Vuforia configuration. Paste your App License Key you have saved from last step.
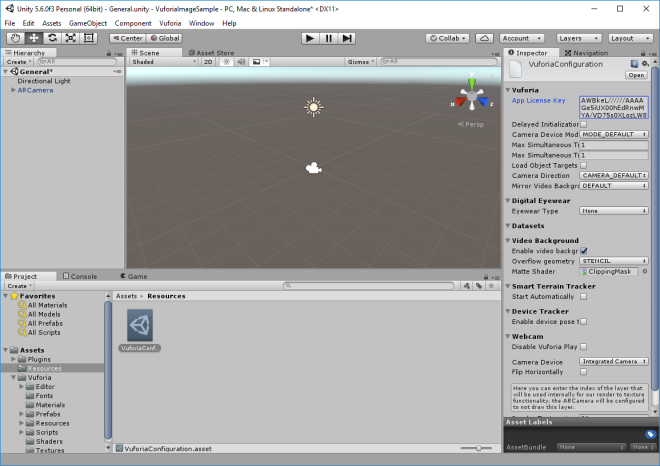
- Locate the Datasets node and ensure the Load is checked and next, check the child Activate. This tells to Vuforia to load and activate the Database when the scene starts. Otherwise, we need to load and activate programmatically.
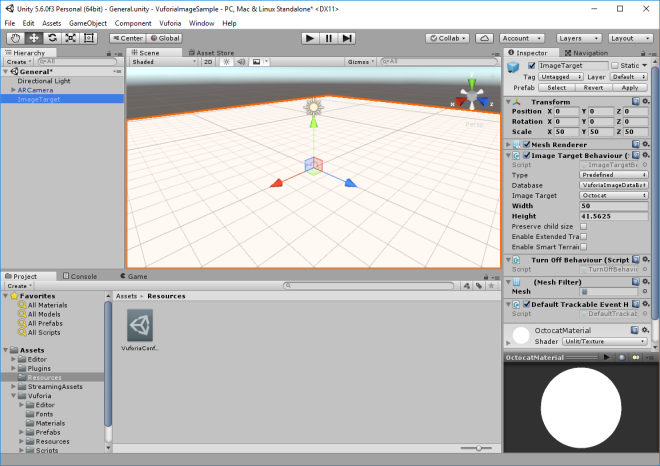
- Go back to the Vuforia\Prefab folder in the Project tab and drag the ImageTarget component to the Hierarchy tab. This component is the responsible for recognizing your image from what the ARCamera capture. Maintain selected this component and go to the Inspector tab and Upload images to a database that later can be used for tracking other images and objects. After that you should note that the ImageTarget is bigger than before. It was scaled to the magic number you entered in the Width image when uploaded.
 Now, you can say that you have an AR app that recognize an image. But if you run the app in Unity3D it will route to your Webcam (if there is one) and however you show the image or not, nothing happens. More specific, you can see if the image is recognized or not.
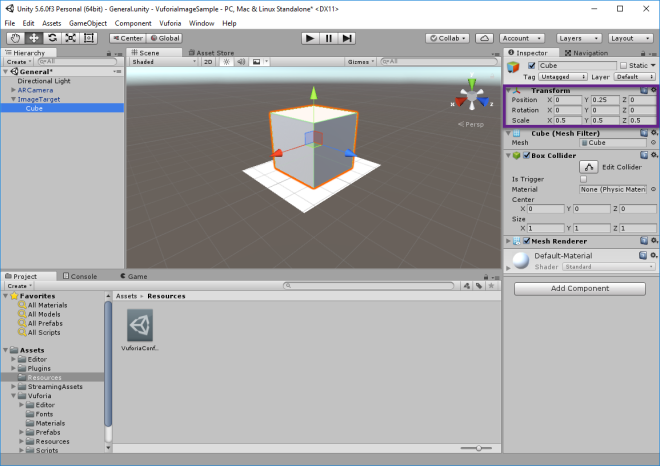
 - First, you will put a basic 3D object as a flag to get notice if the image was or not recognized. Ensure the ImageTarget is still selected and go to the GameObject -> 3D Object -> Cube menu this should add a cube as a child of your ImageTarget. Now, play around with the Transform properties of the cube to accurate to your image. I set the properties as you can see in the next image.
- Now, you can play the project and show to the camera the image you upload. You can print the image or load from another device as a smartphone.
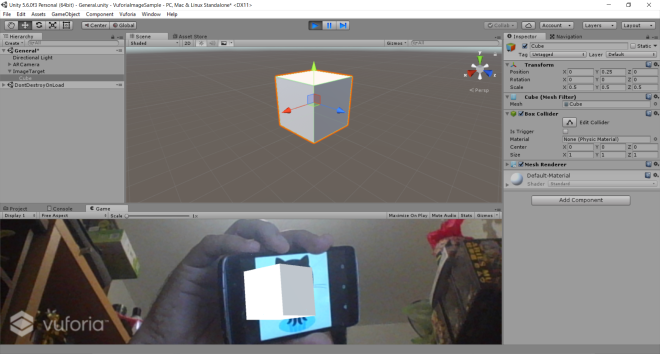
Amazing, huh? You may notice that this would be confusing but once you have done this a few times, it’s become very easy to do.
Notice the Vuforia word and logo. That is because you are using a Development License. This will be removed if you use a paid License Key.
Ensure to save the scene you are working with any name you desired, it not important to what we are doing here the name chosen.
Step 3: More 3D Models
Now, let make it a bit more pretty. Let’s change the boring cube to something more adequate to the image we are tracking. However, the Unity3D’s Asset Store has a lot of material you can import without exit the app, sometimes you can find what you really need. So, I have found a better 3D model to use, the Octocat itself (thanks sillyking for this model). Sadly, to be enabled to download the model you must register.
- Go back to Unity3D and click on the Assets -> Import new Asset menu. Pick up the octocat.obj file from the twice zipped file.
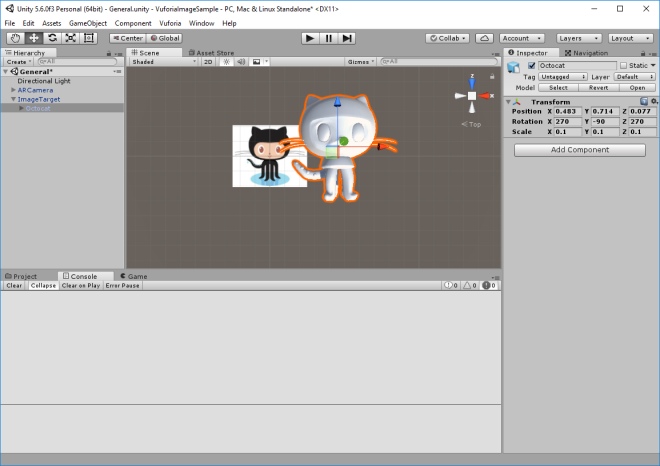
- Delete the ugly cube and drag the Octocat model as a child of the ImageTarget.
- In the Project tab, navigate to the Assets\Editor\QCAR\ImageTargetTexture\\ and select the image that is there. In the Inspector tab, change texture type to sprite and click apply. Now, you can see the original image you have uploaded and recognizing. With that in mind, you can set the transform properties of the Octocat 3D object as you want to base on the right image position. You may use the same position info as I:
- Try to play again and show you image to your cam. Moreover, to see the 3D model in the Game tab, we can see it show/hide likely the same in the Scene tab.

Step 4: Deploy to Android
You can deploy this application to many-many platforms. First, deploy to an Android device (you can choose to deploy to an iOS device, too). You may not have the required Unity3D package for that platform. In that case, Unity3D will display a button to download what is necessary and you only need to install it.
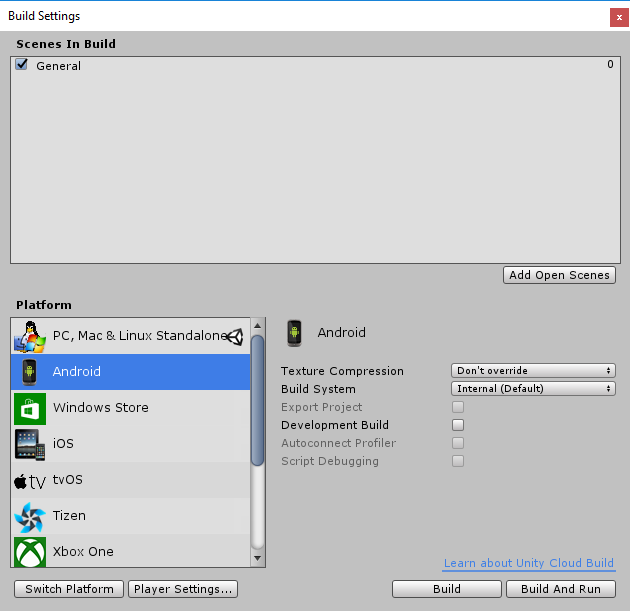
- Go to the File -> Build Settings. In the platform list, select the Android one and click on the Switch platform button.
- Click on the Player Settings, which will open the properties of the Android application.
- Click on the Add Open Scenes button to include the scene you have been working out in the application.
- Click on the Player Settings button and a new tab should appear. Search the section Other Settings and then the subsection Identification. Change the Package Name to something with the format: com... Ensure to save your scene after you made the change. This is required to identify your application property.
- Click on the Build button and you will be prompted to save the .apk that will be generated. Choose any folder of your convenience and accept.
- Now, you can copy the file to your device and run it native.

Step 5: Deploy to HoloLens
To Deploy to HoloLens, you should do several tweaks to your project.
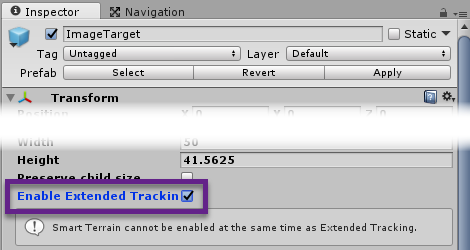
- Select ImageTarget component and Check the Enable Extended Tracking property.
- Download HoloToolkit Package. HoloToolkit is a set of utilities for Unity3D development for HoloLens. It has a cool samples and Prefabs to import (We will see in next posts).
- Go to the menu Asserts -> Import Package -> Custom Package and pick the .unitypackage file you have just downloaded. When a dialog with the details of the files that will be imported is shown, click on Import.
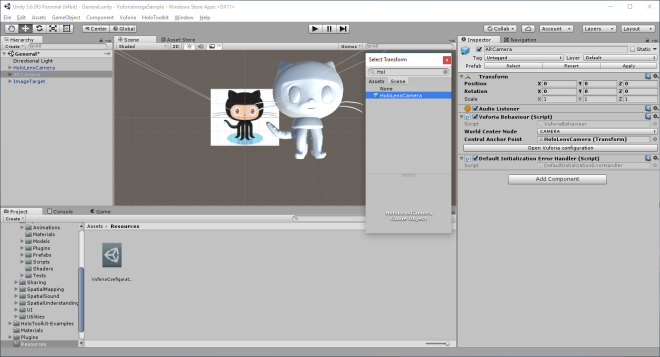
- In the Project tab, locate the Assets\HoloToolkit\Input\Prefabs\HoloLensCamera.prefab and drag to the Hierarchy tab.
- Select the ARCamera component in the Hierarchy tab and at Inspector Tab set the Central Anchor point to HoloLensCamera component.
- You may noticed already that HoloToolkit has added a new menu name HoloToolkit (D’oh!) in Unity3D. Inside this menu there is a sub-menu that will Configure some parts to enabled to work or work fine in side HoloLens. Click Apply HoloLens Scene Settings and a popup should be displayed. Ensure all checks are checked and click Apply. Save your scene.

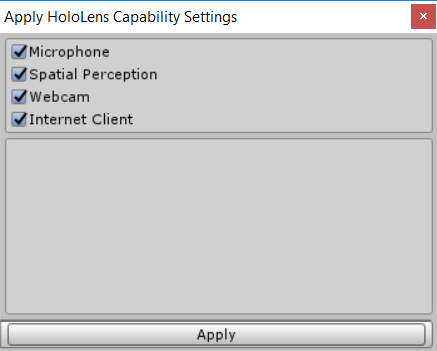
- Next, do the same with the Apply HoloLens Capability Settings. Save your scene.
- Do the same with the Apply HoloLens Project Settings. This popup will requires reload your entire project to force new settings take effect.

- You may do an extra-check for the AppKey and the Load Database and Activate on the VuforiaConfiguration.
- Save your scene, before continuing.
- Finally, go back to the Build window and click the Build button and choose a directory where you would like to export the project.
- Once the build process has ended, open the .sln in the folder you set with Visual Studio. Change the Configuration Setting from ARM to x86 and now you can deploy to your HoloLens or run in the HoloLens Emulator.
Conclusion
In this post, Upload images to a database that later can be used for tracking other images and objects. Moreover, we imported to Unity3D and setup the ARCamera and ImageTarget component. And we imported an external 3D model to our scene. At the end, we build the project for different platform. And we didn’t make a single line of code!
We will continue in a next post showing how to recognize multiple images and how to distinguish each one showing different 3D models or specific data.
